More about machine learning: Machine Learning with Python
- Linear regression
- Logistic regression
- Decision trees
- Random forest
- Gradient boosting
- Machine learning with Python and Scikitlearn
- Neural Networks
- Principal Component Analysis (PCA)
- Clustering with python
- Face Detection and Recognition
- Introduction to Graphs and Networks
Introduction
Deep learning models have become the reference standard across many fields—one of them being computer vision, also known as artificial vision. A widely expanding application of this technology is facial recognition, that is, the automated identification of people appearing in an image or video.
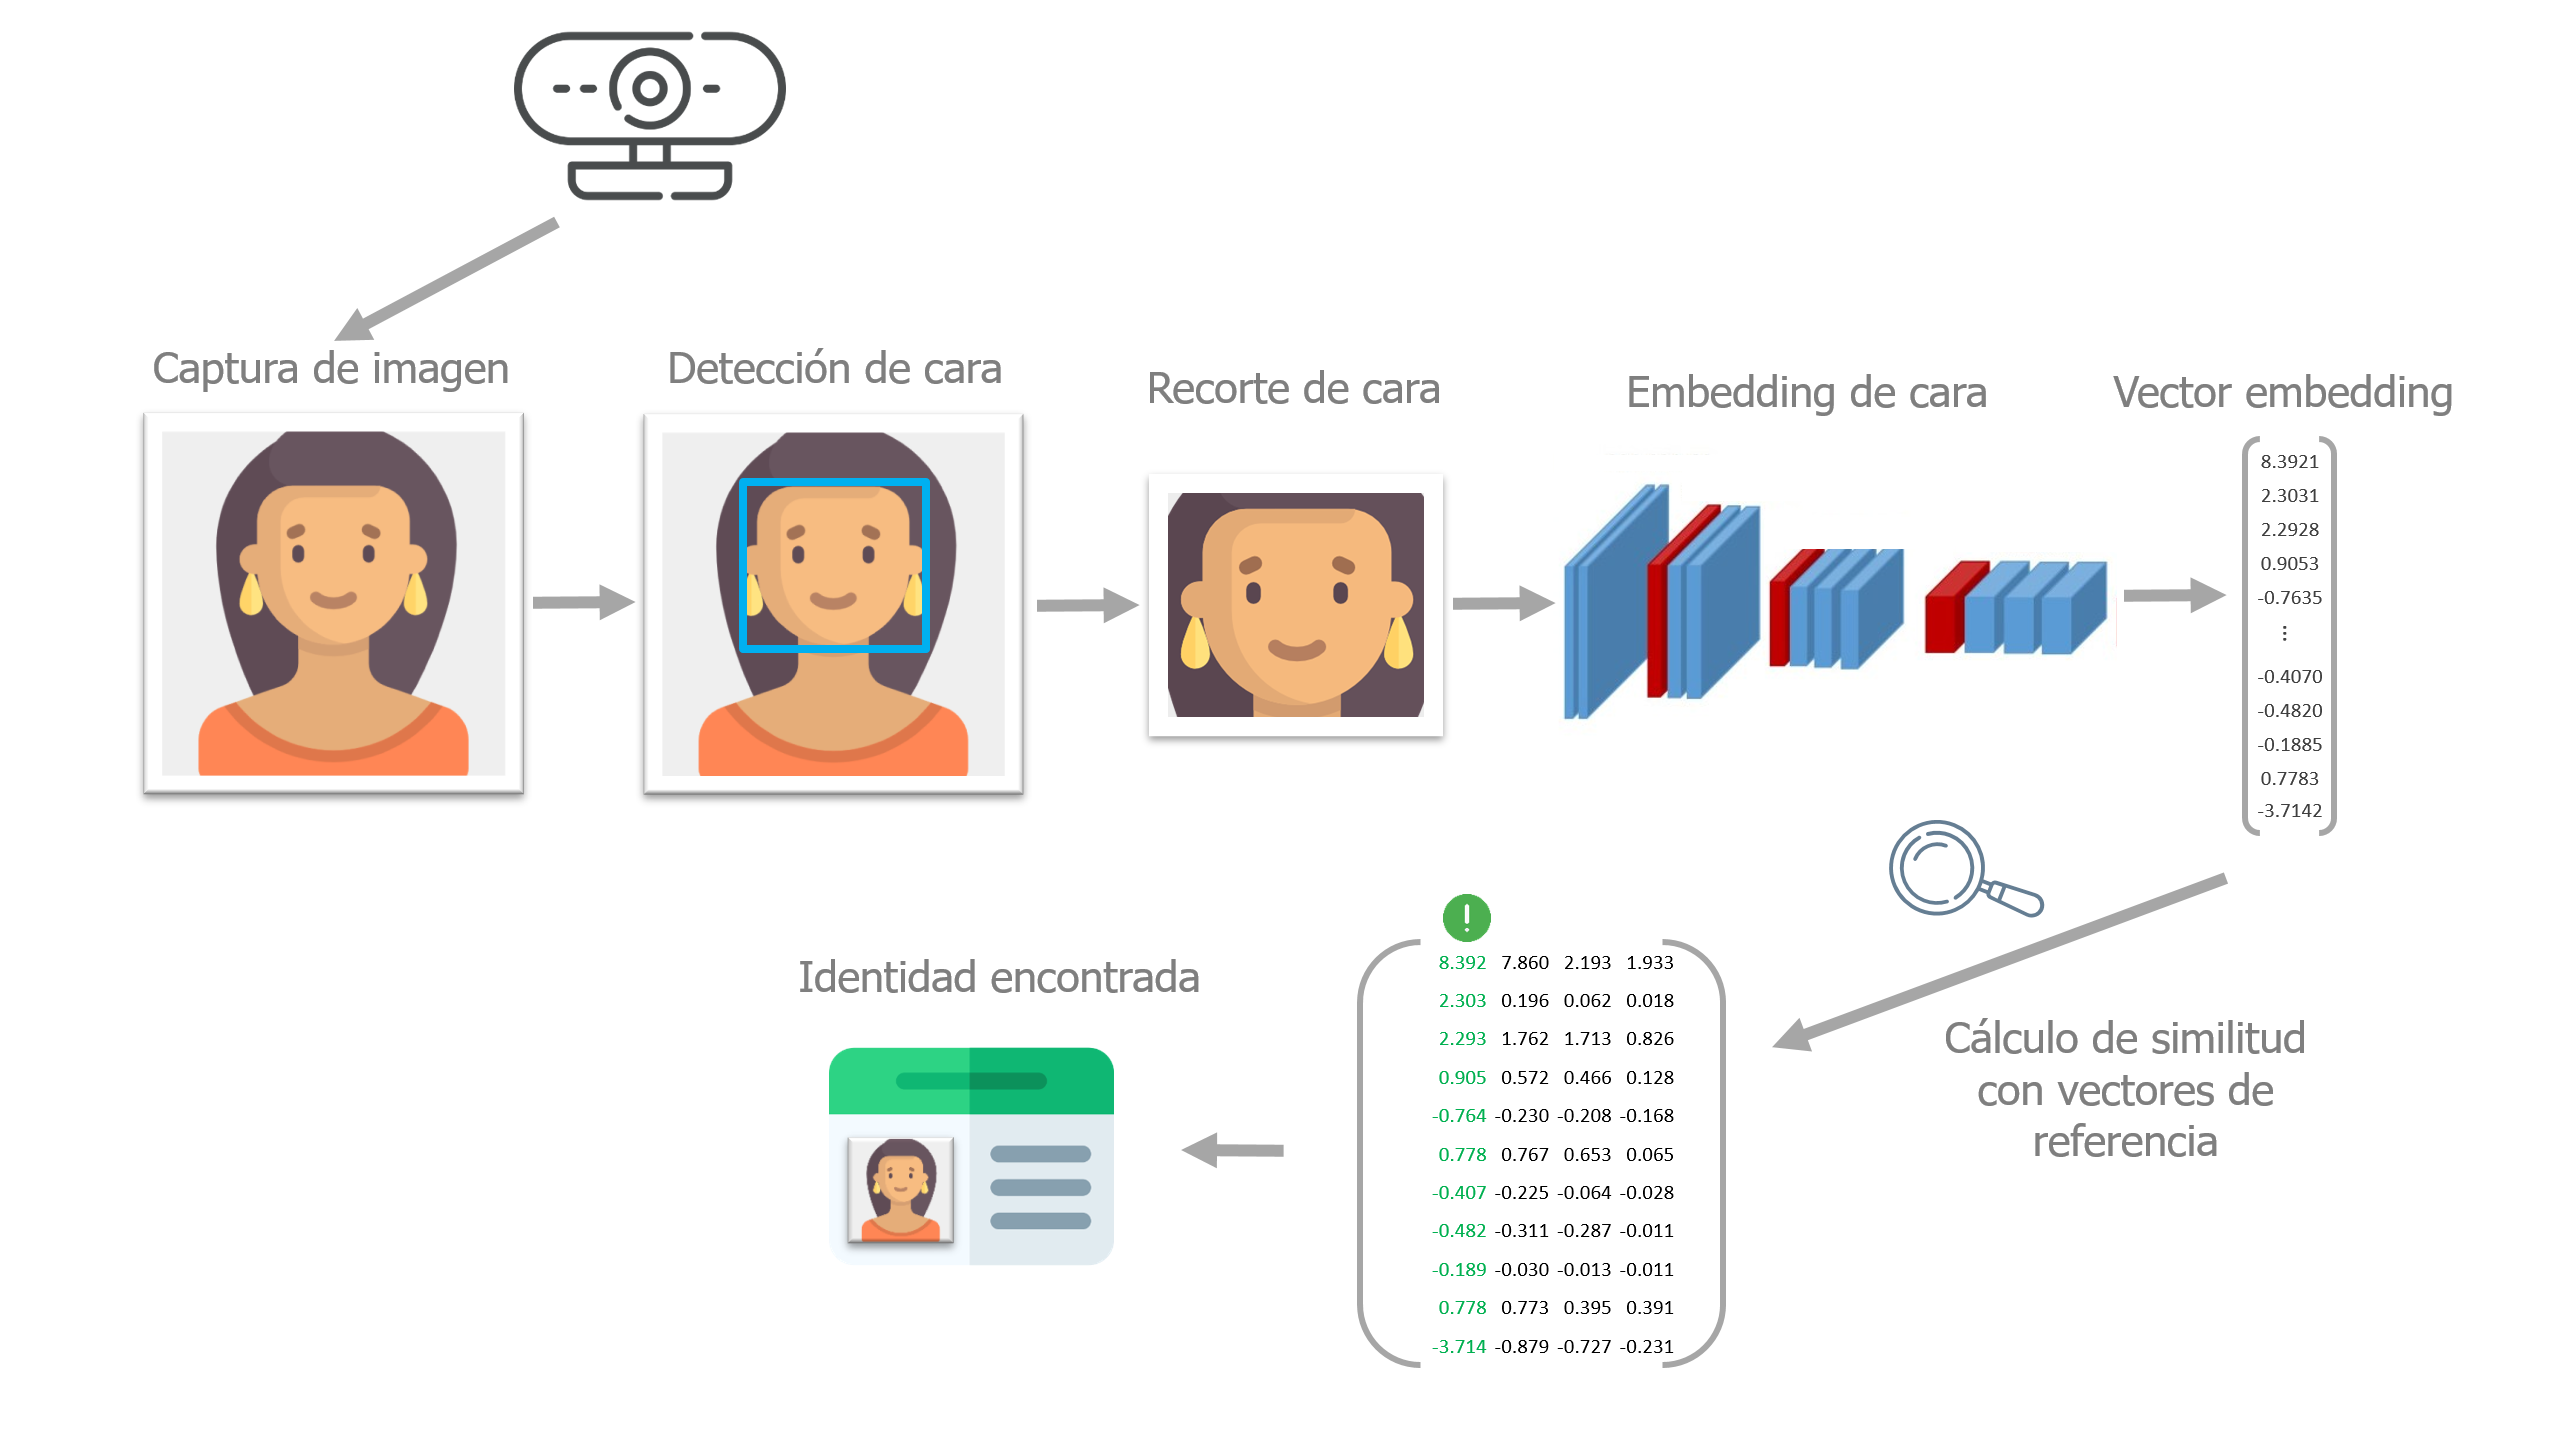
Similar to how humans do it, for a computer system to be able to identify the people shown in an image, several stages are required:
Detect the faces in the image.
Use a neural network capable of mapping the features of a human face into a numerical representation. This step is known as embedding or encoding.
Measure the similarity between the numerical representation of the detected faces and the reference representations available in a database.
Determine whether they are sufficiently similar to be considered the same person and assign the corresponding identity.
Throughout this document, each of these steps is described and applied using OpenFaceKit, a Python package developed by the author of this document that provides tools for face detection and recognition using deep learning.
Libraries and data
# Data manipulation
# ==============================================================================
import os
import urllib
import zipfile
import numpy as np
from urllib.request import urlretrieve
# Image processing
# ==============================================================================
from PIL import Image
import cv2
import matplotlib.pyplot as plt
# Models
# ==============================================================================
import torch
from scipy.spatial.distance import euclidean
from openfacekit import (
FaceRecognizer,
convert_to_matplotlib_rgb,
ReferenceEmbeddings,
)
For the examples in this document, images of the actors from the hilarious series Modern Family are used. As a first step, the images are downloaded into a local folder. This can be easily done in Python using the urlretrieve function from the urllib library.
# Download images
# ==============================================================================
if not os.path.exists('images'):
os.makedirs('images')
# Image with a single face
url = ('https://github.com/JoaquinAmatRodrigo/Estadistica-machine-learning-python/' +
'raw/master/images/phil_dunphy.jpg')
urlretrieve(url=url, filename='images/image_1.jpg')
# Image with multiple faces
url = ('https://github.com/JoaquinAmatRodrigo/Estadistica-machine-learning-python/'
'raw/master/images/modernfamily.jpg')
urlretrieve(url=url, filename='images/image_2.png');
There are several libraries in Python that allow image processing (reading, writing, resizing, cropping, etc.). Three of the most commonly used are OpenCV (cv2), PIL, and matplotlib. It is important to note that OpenCV uses the BGR color format, while PIL and matplotlib use RGB. Fortunately, it is easy to switch between these formats using the functions cv2.cvtColor(image, cv2.COLOR_BGR2RGB) and cv2.cvtColor(image, cv2.COLOR_RGB2BGR).
# Reading images
# ==============================================================================
image_1 = Image.open('./images/image_1.jpg')
image_2 = Image.open('./images/image_2.png')
# image_1 = cv2.imread('images/image_1.jpg')
# image_2 = cv2.imread('images/image_2.png')
# Plot images
# ==============================================================================
plt.figure(figsize=(5, 4))
plt.imshow(image_1)
plt.axis('off')
plt.figure(figsize=(10, 6))
plt.imshow(image_2)
plt.axis('off');


Face detection
The first step in the facial recognition process is to detect where faces are located within an image. Many strategies and detection methods have been developed since the early research in this field, two of the most notable ones being:
MultiTask Cascaded Convolutional Neural Network (MTCNN): This detector combines three neural network models that sequentially refine the detections. Several MTCNN detectors are available for Python. One of the most efficient implementations uses PyTorch and is accessible via the facenet-pytorch library.
YuNet: a Convolutional Neural Network (CNN) based face detector developed by Shiqi Yu in 2018 and open-sourced in 2019. It is optimized for real-time applications and is included in OpenCV since version 4.5.1.
DeepFaceRecognition includes implementations of both detectors, allowing users to choose the one that best suits their needs.
✏️ Note
In order to use the YuNet detector, weights must be downloaded first. They can be obtained from the opencv/face_detection_yunet repository on Hugging Face. The file to download is named `face_detection_yunet_2023mar.onnx`. Once downloaded, it should be placed in a local folder, and its path must be provided when initializing the FaceRecognizer using the argument opencv_yunet_model_path.
Users may also download the weights automatically by using the download_opencv_yunet_model() function from the openfacekit library.
# Initialize face detector
# ==============================================================================
face_detector = FaceRecognizer(
detector = "MTCNN", #"OpenCV_Yunet",
encoder = None,
min_face_size = 20,
thresholds = [0.6, 0.7, 0.7],
min_confidence_detector = 0.5,
similarity_threshold = 0.5,
similarity_metric = "cosine",
keep_all = True,
verbose = True
)
face_detector
-------------- FaceRecognizer -------------- Detector type: MTCNN Encoder type: InceptionResnetV1 Device: cpu Number of reference identities: 0 Similarity metric: cosine Similarity threshold: 0.5 Minimum confidence detector: 0.5
Bounding boxes detection
The method detect_bboxes of the FaceDetector class is used to detect the bounding boxes of the faces present in an image. This method returns the coordinates of the bounding boxes and their associated probabilities.
# Detection of bounding boxes and its probabilities
# ==============================================================================
boxes, probs = face_detector.detect_bboxes(
image = image_2,
fix_bbox = True
)
boxes
---------------- Scanned image ---------------- Detected faces: 12 Detected faces with minimum confidence: 12 Bounding box correction applied: True Bounding box coordinates: [[293, 64, 402, 194], [505, 89, 605, 224], [108, 95, 210, 227], [427, 207, 529, 333], [47, 235, 145, 361], [1069, 134, 1165, 262], [682, 126, 778, 248], [659, 291, 750, 402], [886, 128, 968, 250], [239, 245, 326, 355], [931, 496, 1012, 613], [816, 663, 889, 751]] Bounding box confidence: [0.9999438524246216, 0.9982789754867554, 0.999267041683197, 0.9998809099197388, 0.9999357461929321, 0.9999068975448608, 0.9999818801879883, 0.9996474981307983, 0.9995021820068359, 0.9993504881858826, 0.9991905093193054, 0.9989155530929565]
array([[ 293, 64, 402, 194],
[ 505, 89, 605, 224],
[ 108, 95, 210, 227],
[ 427, 207, 529, 333],
[ 47, 235, 145, 361],
[1069, 134, 1165, 262],
[ 682, 126, 778, 248],
[ 659, 291, 750, 402],
[ 886, 128, 968, 250],
[ 239, 245, 326, 355],
[ 931, 496, 1012, 613],
[ 816, 663, 889, 751]])
It is common to plot the detected bounding boxes on the original image to visually verify the detection results. This can be done using detect_faces method of the FaceDetector class.
# Plot detected bounding boxes on the original image
# ==============================================================================
face_detector.detect_faces(
image = image_2,
fix_bbox = True
)
---------------- Scanned image ---------------- Detected faces: 12 Detected faces with minimum confidence: 12 Bounding box correction applied: True Bounding box coordinates: [[293, 64, 402, 194], [505, 89, 605, 224], [108, 95, 210, 227], [427, 207, 529, 333], [47, 235, 145, 361], [1069, 134, 1165, 262], [682, 126, 778, 248], [659, 291, 750, 402], [886, 128, 968, 250], [239, 245, 326, 355], [931, 496, 1012, 613], [816, 663, 889, 751]] Bounding box confidence: [0.9999438524246216, 0.9982789754867554, 0.999267041683197, 0.9998809099197388, 0.9999357461929321, 0.9999068975448608, 0.9999818801879883, 0.9996474981307983, 0.9995021820068359, 0.9993504881858826, 0.9991905093193054, 0.9989155530929565]

Extract detected faces
The method extract_faces of the FaceDetector class is used to extract the portions of the image that contain faces. The returned object is a tensor with the pixel values of the cropped faces (3 color channels x image_size x image_size). If more than one face is detected, then a tensor of dimensions (number of faces x 3 color channels x image_size x image_size) is returned.
# Extract detected faces
# ==============================================================================
faces, probs = face_detector.extract_faces(image=image_2)
print(f"Shape: {faces.shape}")
Shape: torch.Size([12, 3, 160, 160])
The returned image from the detector is a tensor with dimensions [3, 160, 160], meaning that the color channels are in the first position. To display the image using matplotlib, the channels need to be moved to the last position [160, 160, 3] and converted from a tensor object to a numpy array.
# Plot extracted faces with matplotlib
# ==============================================================================
fig, axs = plt.subplots(nrows=2, ncols=int(np.ceil(len(faces)/2)), figsize=(10, 4))
axs = axs.flatten()
for i in range(faces.shape[0]):
face = convert_to_matplotlib_rgb(faces[i])
# add a title with the probability
axs[i].set_title(f'Prob: {probs[i]:.4f}')
axs[i].imshow(face)
axs[i].axis('off')
fig.tight_layout()
print(faces[0])
tensor([[[ 0.9414, 0.9336, 0.9336, ..., 0.9102, 0.9258, 0.9570],
[ 0.9492, 0.9414, 0.9414, ..., 0.9180, 0.9180, 0.9258],
[ 0.9570, 0.9570, 0.9570, ..., 0.9492, 0.9258, 0.9023],
...,
[-0.2617, -0.2227, -0.1914, ..., -0.2305, -0.2539, -0.2852],
[-0.2539, -0.2148, -0.1914, ..., -0.1914, -0.2148, -0.2539],
[-0.2695, -0.2383, -0.2227, ..., -0.1602, -0.1758, -0.1992]],
[[ 0.9727, 0.9648, 0.9648, ..., 0.9102, 0.9258, 0.9570],
[ 0.9805, 0.9727, 0.9648, ..., 0.9180, 0.9180, 0.9258],
[ 0.9883, 0.9805, 0.9727, ..., 0.9336, 0.9180, 0.9023],
...,
[-0.4023, -0.3633, -0.3398, ..., -0.5117, -0.5273, -0.5586],
[-0.4023, -0.3633, -0.3477, ..., -0.4961, -0.5273, -0.5664],
[-0.4180, -0.3945, -0.3867, ..., -0.4883, -0.5039, -0.5273]],
[[ 0.9961, 0.9883, 0.9883, ..., 0.8867, 0.9180, 0.9570],
[ 0.9961, 0.9961, 0.9961, ..., 0.8945, 0.9102, 0.9258],
[ 0.9961, 0.9961, 0.9961, ..., 0.9102, 0.9102, 0.9023],
...,
[-0.5273, -0.4961, -0.4727, ..., -0.6445, -0.6602, -0.6914],
[-0.5195, -0.4961, -0.4805, ..., -0.6289, -0.6602, -0.6992],
[-0.5508, -0.5273, -0.5195, ..., -0.6211, -0.6289, -0.6523]]])

Embedding of faces
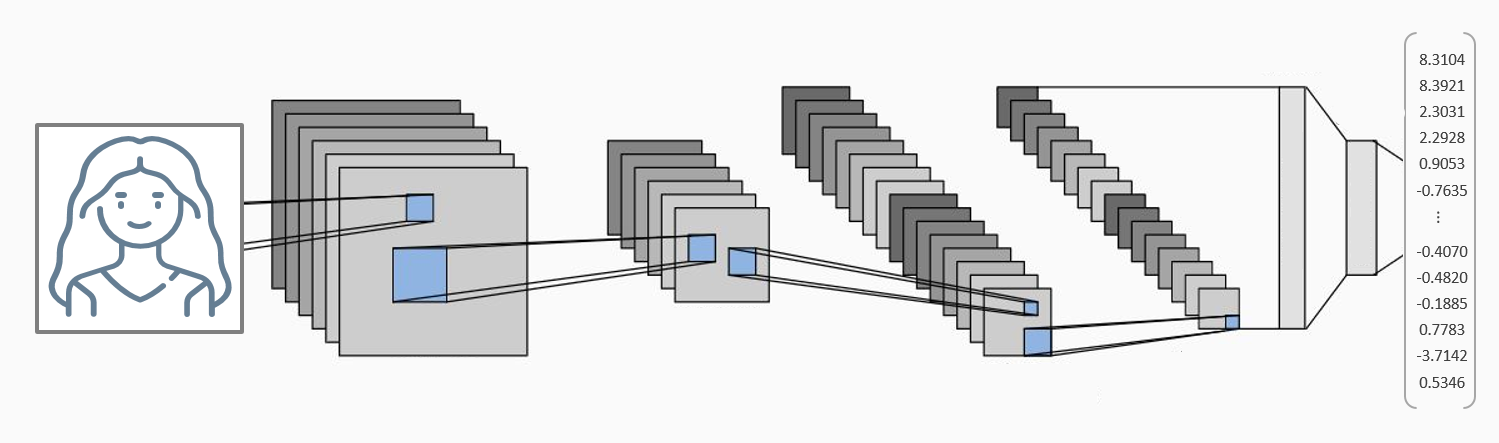
Once the faces in the image have been identified, the next step is to obtain a numerical transformation that represents each face’s unique characteristics. The resulting numerical vector is known as an embedding or encoding.
Deep learning models (convolutional neural networks) capable of generating face embeddings are not easy to train. Fortunately, several pre-trained models are available in Python. Two of the most common are:
face_recognition_model_v1 from the dlib library. This model generates a 128-dimensional embedding.
InceptionResnetV1 from the facenet-pytorch library. This model generates a 512-dimensional embedding.
To build this type of model, a classification network is first trained on a dataset containing many individuals. Once the network is trained, the final softmax layer is removed so that the model’s output becomes a numerical vector.
In this document, the model used is InceptionResnetV1, specifically the version trained on the VGGFace2 dataset.
For more details about this type of model, refer to the VGGFace2 paper.
# Embeding of faces
# ==============================================================================
embeddings = face_detector.calculate_embeddings(face_images=faces)
print(f"Shape: {embeddings.shape}")
embeddings
Shape: torch.Size([12, 512])
tensor([[ 7.3119e-02, 1.3807e-02, -2.0866e-02, ..., -5.1862e-02,
5.5240e-02, 4.7610e-03],
[-6.3946e-02, -1.7960e-02, -3.9687e-02, ..., 6.9325e-02,
-9.6542e-02, -9.4992e-02],
[ 3.1438e-02, 6.8282e-02, -6.3409e-03, ..., -9.6854e-05,
3.9739e-02, -1.2795e-02],
...,
[ 4.7704e-02, -1.6753e-02, 3.7802e-02, ..., -2.9759e-02,
-3.5267e-02, -1.2076e-02],
[ 4.3862e-02, -7.2438e-03, 2.1455e-02, ..., -1.0147e-02,
1.3584e-02, 4.7367e-03],
[-4.3593e-03, -2.1744e-02, 3.1877e-02, ..., -6.5899e-02,
2.2239e-02, 1.8709e-02]])
Measuring face similarity with embeddings
The goal of obtaining a numerical representation of faces (embeddings) is to quantify how similar they are to one another.
Two common ways to calculate this similarity are by using the Euclidean distance or the cosine distance between embeddings. The smaller the distance, the greater the similarity between the faces.
Below is an example where one image is compared against two others: the first belongs to the same person, Phil Dunphy, and the second to Cameron Tucker.
# Extraction of faces
# ==============================================================================
phil_1 = face_detector.extract_faces(image=image_1)[0][0]
phil_2 = face_detector.extract_faces(image=image_2)[0][1]
cameron = face_detector.extract_faces(image=image_2)[0][2]
# Plot extracted faces
# ==============================================================================
fig, axs = plt.subplots(nrows=1, ncols=3, figsize=(10, 6))
face = convert_to_matplotlib_rgb(phil_1)
axs[0].imshow(face)
axs[0].set_title('Phil 1')
axs[0].axis('off')
face = convert_to_matplotlib_rgb(phil_2)
axs[1].imshow(face)
axs[1].set_title('Phil 2')
axs[1].axis('off')
face = convert_to_matplotlib_rgb(cameron)
axs[2].imshow(face)
axs[2].set_title('Cameron')
axs[2].axis('off');

Once the 3 faces are extracted from the images, their embeddings are created, and the similarities between them are calculated using the Euclidean distance.
# Embeddings
# ==============================================================================
embedding_phil_1 = face_detector.calculate_embeddings(face_images=phil_1.reshape((1, 3, 160, 160))).flatten()
embedding_phil_2 = face_detector.calculate_embeddings(face_images=phil_2.reshape((1, 3, 160, 160))).flatten()
embedding_cameron = face_detector.calculate_embeddings(face_images=cameron.reshape((1, 3, 160, 160))).flatten()
# Similarity between embeddings
# ==============================================================================
print(f"Similarity between the same image Phil: {1 - euclidean(embedding_phil_1, embedding_phil_1)}")
print(f"Similarity between the two images of Phil: {1 - euclidean(embedding_phil_1, embedding_phil_2)}")
print(f"Similarity between Phil and Cameron: {1 - euclidean(embedding_phil_1, embedding_cameron)}")
Similarity between the same image Phil: 1.0 Similarity between the two images of Phil: 0.40968143939971924 Similarity between Phil and Cameron: -0.3885413408279419
It can be observed that the similarity between the two images of Phil is significantly higher than the similarity between Phil and Cameron, indicating that the embeddings effectively capture the facial features that differentiate individuals.
Collection of reference embeddings
To identify who a face belongs to, it is necessary to compare it against a database that contains a reference embedding for each identity.
The newly detected face is compared against all the reference embeddings in the database. If the similarity between the new embedding and any of the reference embeddings is above a certain threshold, the identity associated with that reference embedding is assigned to the detected face. If no similarities are above the threshold, the face is classified as "unknown."
DeepFaceRecognition provides the class ReferenceEmbeddings to facilitate the management of a database of reference embeddings. Given a path to a folder with images of known individuals, this class can automatically create and store the reference embeddings for each identity.
The image or images of each person are assumed to be located in a subfolder named after that person's identity. For this example, a folder structure like the following is used:
./images/reference_images
├── AlexDunphy
│ ├── 5e8f3e2373d0c84a052dc5e2.jpg
│ ├── AlexDunphy.png
│ └── alex-black-floral-ruffle-blouse.jpg
├── CameronTucker
│ ├── CameronTucker.png
│ └── descarga.jpg
├── ClaireDunphy
│ ├── ClaireDunphy.png
│ ├── descarga (1).jpg
│ └── frantic-claire-modern-family-s11e17.jpg
├── GloriaPritchett
│ ├── 46623-1532336916.jpg
│ ├── GloriaPritchett.png
│ └── descarga.jpg
├── HaleyDunphy
│ ├── HaleyDunphy.png
│ ├── descarga (1).jpg
│ ├── descarga.jpg
│ └── sarah-hyland-modern-family-1557405158.jpg
├── JayPritchett
│ ├── JayPritchett.png
│ └── descarga (2).jpg
├── JoePritchett
│ ├── JoePritchett.png
│ ├── Joe_Pritchett.jpg
│ ├── descarga.jpg
│ ├── images (1).jpg
│ └── images.jpg
├── LilyTucker-Pritchett
│ ├── LilyTucker-Pritchett.png
│ ├── descarga (1).jpg
│ ├── descarga (2).jpg
│ └── descarga.jpg
├── LukeDunphy
│ ├── LukeDunphy.png
│ ├── descarga (1).jpg
│ ├── descarga (3).jpg
│ └── descarga.jpg
├── MannyDelgado
│ ├── 58.jpg
│ ├── Manny-S11.jpg
│ ├── MannyDelgado.png
│ ├── descarga (2).jpg
│ ├── fca262d92ce831635d991deeb61fed1b.png
│ └── modern_family_manny_delgado_1_201215_glv63ple3v.jpeg
├── MitchellPritchett
│ ├── Jesse_Tyler_Fergeuson_Muppets_Most_Wanted_Premiere_(cropped).jpg
│ ├── MitchellPritchett.png
│ └── descarga.jpg
└── PhilDunphy
├── 1503333585_649717_1503333744_noticia_normal.jpg
├── 186708-4.jpg
├── Phil-S11.jpg
└── PhilDunphy.png# Download reference images
# ==============================================================================
url = (
"https://github.com/JoaquinAmatRodrigo/Estadistica-machine-learning-python/"
"raw/master/images/imagenes_referencia_reconocimiento_facial.zip"
)
extract_dir = "./images/reference_images"
os.makedirs(extract_dir, exist_ok=True)
zip_path, _ = urllib.request.urlretrieve(url)
with zipfile.ZipFile(zip_path, "r") as f:
f.extractall(extract_dir)
print("Images successfully downloaded and extracted to:", extract_dir)
Images successfully downloaded and extracted to: ./images/reference_images
# Create reference embeddings from a folder of images
# ==============================================================================
reference_embeddings = ReferenceEmbeddings(
folder_path='./images/reference_images'
)
reference_embeddings.calculate_reference_embeddings()
reference_embeddings
Processing identity: JayPritchett Reading image: ./images/reference_images/JayPritchett/descarga (2).jpg Reading image: ./images/reference_images/JayPritchett/JayPritchett.png Processing identity: AlexDunphy Reading image: ./images/reference_images/AlexDunphy/5e8f3e2373d0c84a052dc5e2.jpg Reading image: ./images/reference_images/AlexDunphy/alex-black-floral-ruffle-blouse.jpg Reading image: ./images/reference_images/AlexDunphy/AlexDunphy.png Processing identity: CameronTucker Reading image: ./images/reference_images/CameronTucker/descarga.jpg Reading image: ./images/reference_images/CameronTucker/CameronTucker.png Processing identity: JoePritchett Reading image: ./images/reference_images/JoePritchett/images (1).jpg Reading image: ./images/reference_images/JoePritchett/images.jpg Reading image: ./images/reference_images/JoePritchett/Joe_Pritchett.jpg Reading image: ./images/reference_images/JoePritchett/descarga.jpg Reading image: ./images/reference_images/JoePritchett/JoePritchett.png Processing identity: MitchellPritchett Reading image: ./images/reference_images/MitchellPritchett/Jesse_Tyler_Fergeuson_Muppets_Most_Wanted_Premiere_(cropped).jpg Reading image: ./images/reference_images/MitchellPritchett/descarga.jpg Reading image: ./images/reference_images/MitchellPritchett/MitchellPritchett.png Processing identity: HaleyDunphy Reading image: ./images/reference_images/HaleyDunphy/sarah-hyland-modern-family-1557405158.jpg More than 2 faces detected in image, The face with the highest confidence will be used: ./images/reference_images/HaleyDunphy/sarah-hyland-modern-family-1557405158.jpg Reading image: ./images/reference_images/HaleyDunphy/descarga (1).jpg Reading image: ./images/reference_images/HaleyDunphy/descarga.jpg Reading image: ./images/reference_images/HaleyDunphy/HaleyDunphy.png Processing identity: PhilDunphy Reading image: ./images/reference_images/PhilDunphy/186708-4.jpg Reading image: ./images/reference_images/PhilDunphy/Phil-S11.jpg Reading image: ./images/reference_images/PhilDunphy/1503333585_649717_1503333744_noticia_normal.jpg Reading image: ./images/reference_images/PhilDunphy/PhilDunphy.png Processing identity: JoaquinAmat Reading image: ./images/reference_images/JoaquinAmat/joaquin_amat.jpg Processing identity: MannyDelgado Reading image: ./images/reference_images/MannyDelgado/Manny-S11.jpg Reading image: ./images/reference_images/MannyDelgado/descarga (2).jpg Reading image: ./images/reference_images/MannyDelgado/58.jpg Reading image: ./images/reference_images/MannyDelgado/modern_family_manny_delgado_1_201215_glv63ple3v.jpeg Reading image: ./images/reference_images/MannyDelgado/fca262d92ce831635d991deeb61fed1b.png Reading image: ./images/reference_images/MannyDelgado/MannyDelgado.png Processing identity: LilyTucker-Pritchett Reading image: ./images/reference_images/LilyTucker-Pritchett/descarga (1).jpg More than 2 faces detected in image, The face with the highest confidence will be used: ./images/reference_images/LilyTucker-Pritchett/descarga (1).jpg Reading image: ./images/reference_images/LilyTucker-Pritchett/descarga (2).jpg Reading image: ./images/reference_images/LilyTucker-Pritchett/descarga.jpg Reading image: ./images/reference_images/LilyTucker-Pritchett/LilyTucker-Pritchett.png Processing identity: ClaireDunphy Reading image: ./images/reference_images/ClaireDunphy/descarga (1).jpg Reading image: ./images/reference_images/ClaireDunphy/frantic-claire-modern-family-s11e17.jpg More than 2 faces detected in image, The face with the highest confidence will be used: ./images/reference_images/ClaireDunphy/frantic-claire-modern-family-s11e17.jpg Reading image: ./images/reference_images/ClaireDunphy/ClaireDunphy.png Processing identity: GloriaPritchett Reading image: ./images/reference_images/GloriaPritchett/46623-1532336916.jpg Reading image: ./images/reference_images/GloriaPritchett/descarga.jpg Reading image: ./images/reference_images/GloriaPritchett/GloriaPritchett.png Processing identity: LukeDunphy Reading image: ./images/reference_images/LukeDunphy/descarga (1).jpg Reading image: ./images/reference_images/LukeDunphy/descarga (3).jpg Reading image: ./images/reference_images/LukeDunphy/descarga.jpg Reading image: ./images/reference_images/LukeDunphy/LukeDunphy.png
-------------------
ReferenceEmbeddings
-------------------
Number of identities: 13
Number of images per identity: {'JayPritchett': 2, 'AlexDunphy': 3, 'CameronTucker': 2, 'JoePritchett': 5, 'MitchellPritchett': 3, 'HaleyDunphy': 4, 'PhilDunphy': 4, 'JoaquinAmat': 1, 'MannyDelgado': 6, 'LilyTucker-Pritchett': 4, 'ClaireDunphy': 3, 'GloriaPritchett': 3, 'LukeDunphy': 4}
Source folder: ./images/reference_images
Save path: None
Device: None
Minimum face size: 20
Detection thresholds: [0.6, 0.7, 0.7]
Minimum confidence for detection: 0.5
Verbose: True
Once the reference embeddings have been created, they can be loaded into the FaceDetector class to perform face recognition on new images using the load_reference_embeddings method. Then, the identify_faces method can be used to detect and recognize faces in new images.
# Load reference embeddings into the face_detector
# ==============================================================================
face_detector.load_reference_embeddings(reference_embeddings)
# Detect and recognize faces in a image
# ==============================================================================
identities, similarities = face_detector.identify_faces(embeddings=embeddings)
print(f"Identities: {identities}")
print(f"Similarities: {similarities}")
---------------- Identified faces ---------------- Face 0: Identity: JayPritchett, Similarity: 0.69 Face 1: Identity: PhilDunphy, Similarity: 0.92 Face 2: Identity: CameronTucker, Similarity: 0.80 Face 3: Identity: MannyDelgado, Similarity: 0.87 Face 4: Identity: HaleyDunphy, Similarity: 0.75 Face 5: Identity: ClaireDunphy, Similarity: 0.78 Face 6: Identity: MitchellPritchett, Similarity: 0.61 Face 7: Identity: AlexDunphy, Similarity: 0.62 Face 8: Identity: GloriaPritchett, Similarity: 0.68 Face 9: Identity: LukeDunphy, Similarity: 0.79 Face 10: Identity: LilyTucker-Pritchett, Similarity: 0.80 Face 11: Identity: JoePritchett, Similarity: 0.77 Identities: ['JayPritchett', 'PhilDunphy', 'CameronTucker', 'MannyDelgado', 'HaleyDunphy', 'ClaireDunphy', 'MitchellPritchett', 'AlexDunphy', 'GloriaPritchett', 'LukeDunphy', 'LilyTucker-Pritchett', 'JoePritchett'] Similarities: [0.6871325969696045, 0.9191560745239258, 0.7987002730369568, 0.874779462814331, 0.746529757976532, 0.7806506752967834, 0.6057980060577393, 0.6189405918121338, 0.6765539646148682, 0.7890835404396057, 0.7986713647842407, 0.7654215693473816]
Is it also possible detect, identify, and plot the bounding boxes of the recognized faces in a single step using the detect_and_identify_faces method.
face_detector.detect_and_identify_faces(image=image_2)
---------------- Scanned image ---------------- Detected faces: 12 Detected faces with minimum confidence: 12 Bounding box correction applied: True Bounding box coordinates: [[293, 64, 402, 194], [505, 89, 605, 224], [108, 95, 210, 227], [427, 207, 529, 333], [47, 235, 145, 361], [1069, 134, 1165, 262], [682, 126, 778, 248], [659, 291, 750, 402], [886, 128, 968, 250], [239, 245, 326, 355], [931, 496, 1012, 613], [816, 663, 889, 751]] Bounding box confidence: [0.9999438524246216, 0.9982789754867554, 0.999267041683197, 0.9998809099197388, 0.9999357461929321, 0.9999068975448608, 0.9999818801879883, 0.9996474981307983, 0.9995021820068359, 0.9993504881858826, 0.9991905093193054, 0.9989155530929565] ---------------- Identified faces ---------------- Face 0: Identity: JayPritchett, Similarity: 0.68 Face 1: Identity: PhilDunphy, Similarity: 0.92 Face 2: Identity: CameronTucker, Similarity: 0.80 Face 3: Identity: MannyDelgado, Similarity: 0.88 Face 4: Identity: HaleyDunphy, Similarity: 0.74 Face 5: Identity: ClaireDunphy, Similarity: 0.77 Face 6: Identity: MitchellPritchett, Similarity: 0.61 Face 7: Identity: AlexDunphy, Similarity: 0.63 Face 8: Identity: GloriaPritchett, Similarity: 0.67 Face 9: Identity: LukeDunphy, Similarity: 0.79 Face 10: Identity: LilyTucker-Pritchett, Similarity: 0.80 Face 11: Identity: JoePritchett, Similarity: 0.76

Pipeline for face detection and recognition
All the steps described above can be combined into a single pipeline for face recognition in images, videos, or real-time video streams.
Pipeline for face recognition in images
# Create reference embeddings from a folder of images
# ==============================================================================
reference_embeddings = ReferenceEmbeddings(
folder_path ='./images/reference_images',
verbose = False
)
reference_embeddings.calculate_reference_embeddings()
reference_embeddings
-------------------
ReferenceEmbeddings
-------------------
Number of identities: 13
Number of images per identity: {'JayPritchett': 2, 'AlexDunphy': 3, 'CameronTucker': 2, 'JoePritchett': 5, 'MitchellPritchett': 3, 'HaleyDunphy': 4, 'PhilDunphy': 4, 'JoaquinAmat': 1, 'MannyDelgado': 6, 'LilyTucker-Pritchett': 4, 'ClaireDunphy': 3, 'GloriaPritchett': 3, 'LukeDunphy': 4}
Source folder: ./images/reference_images
Save path: None
Device: None
Minimum face size: 20
Detection thresholds: [0.6, 0.7, 0.7]
Minimum confidence for detection: 0.5
Verbose: False
# Load reference embeddings into the face detector
# ==============================================================================
face_detector.load_reference_embeddings(reference_embeddings)
# Detect and recognize faces in an image
# ==============================================================================
face_detector.detect_and_identify_faces(image=image_2)
---------------- Scanned image ---------------- Detected faces: 12 Detected faces with minimum confidence: 12 Bounding box correction applied: True Bounding box coordinates: [[293, 64, 402, 194], [505, 89, 605, 224], [108, 95, 210, 227], [427, 207, 529, 333], [47, 235, 145, 361], [1069, 134, 1165, 262], [682, 126, 778, 248], [659, 291, 750, 402], [886, 128, 968, 250], [239, 245, 326, 355], [931, 496, 1012, 613], [816, 663, 889, 751]] Bounding box confidence: [0.9999438524246216, 0.9982789754867554, 0.999267041683197, 0.9998809099197388, 0.9999357461929321, 0.9999068975448608, 0.9999818801879883, 0.9996474981307983, 0.9995021820068359, 0.9993504881858826, 0.9991905093193054, 0.9989155530929565] ---------------- Identified faces ---------------- Face 0: Identity: JayPritchett, Similarity: 0.68 Face 1: Identity: PhilDunphy, Similarity: 0.92 Face 2: Identity: CameronTucker, Similarity: 0.80 Face 3: Identity: MannyDelgado, Similarity: 0.88 Face 4: Identity: HaleyDunphy, Similarity: 0.74 Face 5: Identity: ClaireDunphy, Similarity: 0.77 Face 6: Identity: MitchellPritchett, Similarity: 0.61 Face 7: Identity: AlexDunphy, Similarity: 0.63 Face 8: Identity: GloriaPritchett, Similarity: 0.67 Face 9: Identity: LukeDunphy, Similarity: 0.79 Face 10: Identity: LilyTucker-Pritchett, Similarity: 0.80 Face 11: Identity: JoePritchett, Similarity: 0.76
Pipeline for face recognition in videos
Processing videos requires handling each of its frames, making it computationally intensive. It is recommended to use GPUs. The video used for this example can be downloaded from the following link.
# Detect and recognize faces in a video
# ==============================================================================
face_detector.detect_and_identify_faces_video(
video_path = './videos/video_modern_family.mp4',
output_path = './videos/output_test.mp4'
)
Pipeline for face recognition in webcam
The argument capture_index specifies which camera to use (0 for the default camera, 1 for an external camera, etc.). The argument skip_frames allows skipping a certain number of frames between each processing step to improve performance. The argument show indicates whether to display the video with the detected and identified faces in real-time.
# Detect and recognize faces in webcam (real-time streaming)
# ==============================================================================
face_detector.detect_and_identify_faces_webcam(
capture_index = 0, # change to 1 or 2 if you have an external webcam
skip_frames = 2,
show = True
)
Session Information
import session_info
session_info.show(html=False)
----- PIL 12.0.0 cv2 4.12.0 matplotlib 3.10.7 numpy 2.2.6 openfacekit 0.2.0 scipy 1.16.3 session_info v1.0.1 torch 2.7.1+cu126 ----- IPython 9.6.0 jupyter_client 8.6.3 jupyter_core 5.9.1 ----- Python 3.12.12 | packaged by conda-forge | (main, Oct 22 2025, 23:25:55) [GCC 14.3.0] Linux-6.14.0-34-generic-x86_64-with-glibc2.39 ----- Session information updated at 2025-11-04 11:25
How to Cite
How to cite this document?
If you use this document or any part of it, we appreciate your citation. Thank you very much!
Face detection and recognition with deep learning and python by Joaquín Amat Rodrigo, available under an Attribution-NonCommercial-ShareAlike 4.0 International (CC BY-NC-SA 4.0 DEED) license at https://cienciadedatos.net/documentos/py34-face-detection-and-recognition-python.html
Did you like the article? Your support is important
Your contribution will help me continue generating free educational content. Thank you very much! 😊


This document created by Joaquín Amat Rodrigo is licensed under an Attribution-NonCommercial-ShareAlike 4.0 International license.
You are allowed to:
-
Share: copy and redistribute the material in any medium or format.
-
Adapt: remix, transform, and build upon the material.
Under the following terms:
-
Attribution: You must give appropriate credit, provide a link to the license, and indicate if changes were made. You may do so in any reasonable manner, but not in any way that suggests the licensor endorses you or your use.
-
Non-Commercial: You may not use the material for commercial purposes.
-
ShareAlike: If you remix, transform, or build upon the material, you must distribute your contributions under the same license as the original.